Authentication and Single Sign-On (SSO)
In this section, we’ll see how to configure Google and Microsoft Azure Single-sign on (SSO) on your server. We’ll also see how to configure Okta, PingFederate, or any other authentication provider that supports the Open ID Connect protocol.
With this feature enabled, end users would be able to use their IDs with third-party authentication providers mentioned above to log in to Seclore.
Setting up Google single-sign on
Click on the Configuration > Authentication and SSO tab.
Click Google.
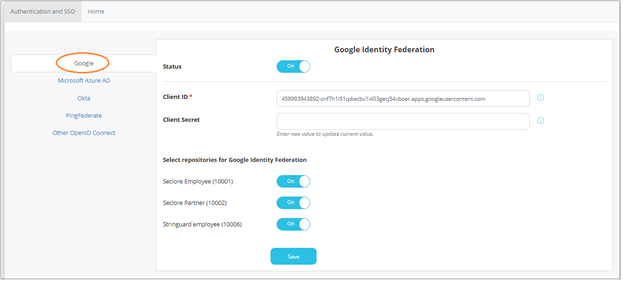
- Click the switch against Status to enable Google SSO.
- Enter the Client ID and Client Secret provided by Google during the registration process.
- Select the repositories for which you wish to enable this feature.
- Click Save to save your changes.
Setting up Microsoft Azure single-sign on
Click on the Configuration > Authentication and SSO tab.
Click Microsoft Azure.
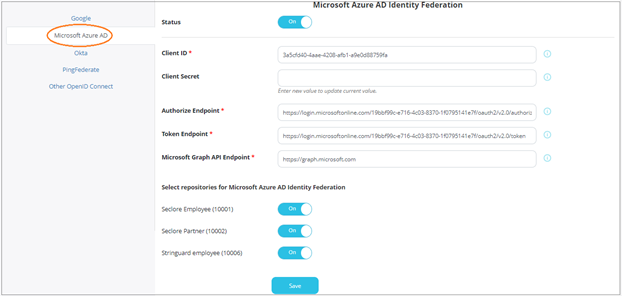
Click the switch against Status to enable Microsoft Azure SSO.
Enter the following details.
- Client ID : The client identifier used to identify the client during the application registration process.
- Client Secret : The client secret is issued to the client during the application registration process.
- Authorize Endpoint : The endpoint for authorization server. This is used to get the authorization code.
- Token Endpoint : The endpoint for authorization server. This is used to exchange the authorization code for an access token.
- Microsoft Graph API Endpoint : The endpoint for resource server. This is used to access required information using exposed APIs.
Next, you can also select the repositories for which this feature will be enabled.
Click Save to save your changes.
Setting up Okta
Click on the Configuration > Authentication and SSO tab.
Click Okta.
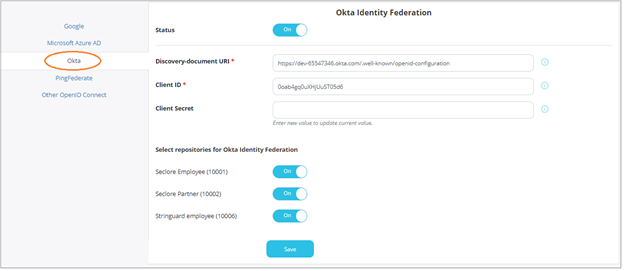
- Click the switch against Status to enable Okta.
- Enter the Discovery-document URI, Client ID, and Client Secret provided by Okta during the registration process.
- Select the repositories for which you wish to enable this feature.
- Click Save to save your changes.
Setting up PingFederate
Click on the Configuration > Authentication and SSO tab.
Click PingFederate.
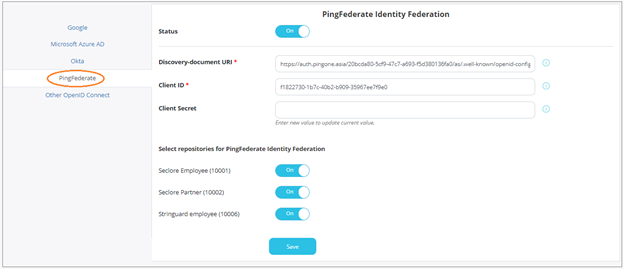
- Click the switch against Status to enable PingFederate.
- Enter the Discovery-document URI, Client ID, and Client Secret provided by PingFederate during the registration process.
- Select the repositories for which you wish to enable this feature.
- Click Save to save your changes.
Setting up other OpenID Connect applications
You can also set up other out-of-the-box applications or any custom application that supports OpenID Connect.
Click on the Configuration > Authentication and SSO tab.
Click Other OpenID Connect.
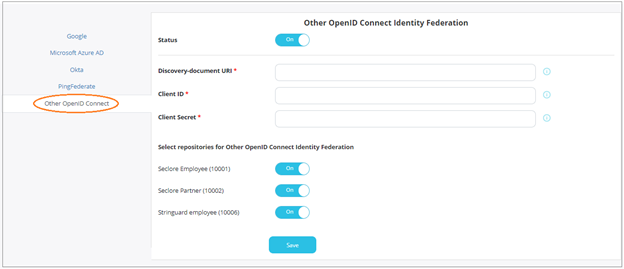
- Click the switch against Status to enable PingFederate.
- Enter the Discovery-document URI, Client ID, and Client Secret for the application.
- Select the repositories for which you wish to enable this feature.
- Click Save to save your changes.